Microsoft Entra ID (formely Azure AD) Configuration
If a SharePoint Online site is configured to require a multi-factor authentication, TreeSize will perform a browser based authentication (as known from other Microsoft Entra ID apps).
To enable TreeSize to get authentication tokens from your Microsoft Entra ID tenant, you have to register it in your Azure portal first and grant it permission to access Office 365 SharePoint Online:
Register TreeSize with your tenant
Note
The following steps have to be done out of the scope of TreeSize. They may change with the ongoing development from Microsoft.
Sign in to the Azure portal.
Select on All services in the left-hand navigation, and choose App registrations (or use the search field in the top bar)
Select New application registration and create a registration with values like:
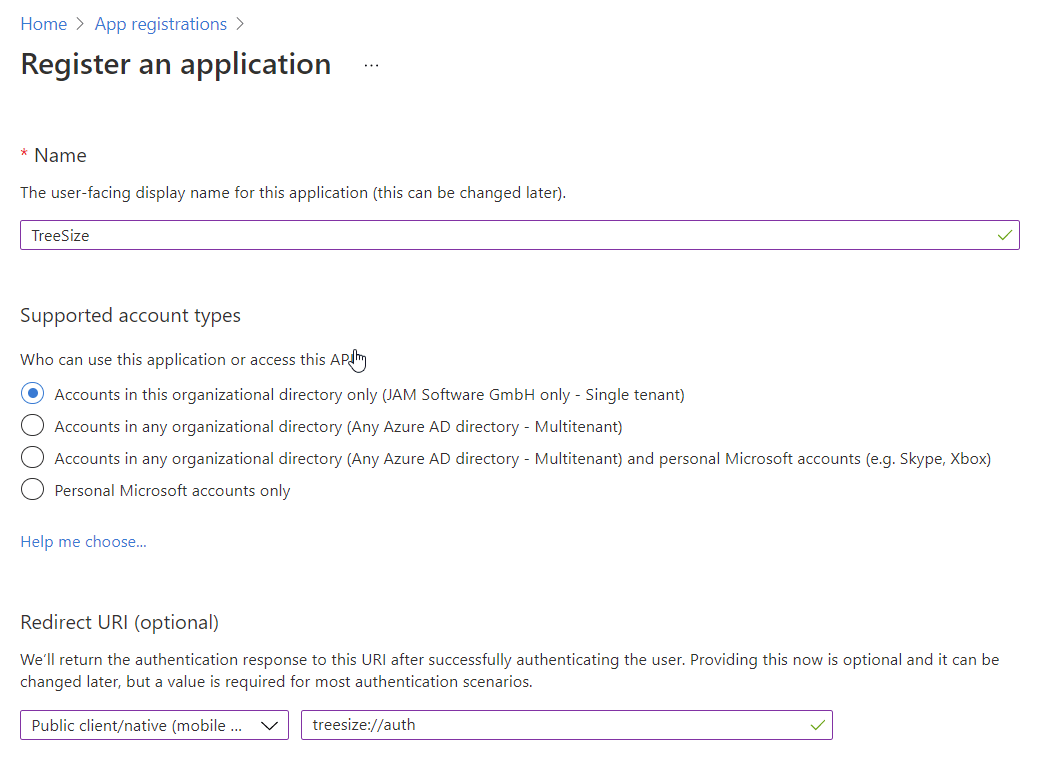
Name: An application name of your choice to identify the registration in Microsoft Entra ID. We would propose to use TreeSize.
Redirect URI: Sometimes referred to as reply URL. Please select
'Public client/native'here. For certificate-based authentication, please either use the redirect URI provided for this purpose, or define your own according to the scheme"My URI"://auth, e.g.|prod|://auth. For user-based authentication, please configure a Redirect URI in your Microsoft Entra registration in the following format:"ms-appx-web://microsoft.aad.brokerplugin/{client_id}". Please ensure to replace`{client_id}`with your actual client ID.
Once the registration is completed, Microsoft Entra ID will assign a unique Application ID to the app. Copy this value from the right pane, as it will be required for the next steps.
Depending on which authentication method you wish to use, please configure the necessary api permissions as described under Certificate-Based Authentication or User based authentication. Without having the necessary permissions configured, the scan will not work.
Provide TreeSize with the configuration information
In order to use the app registration made above, the information has to be provided to TreeSize. The Redirect URI does only need to be provided if you are using the certificate-based authentication. There are three options available how to achieve this:
If you want to configure these settings for a single user/computer only, e.g. to evaluate and test the settings, you can do so in the options dialog or you can pass the values to TreeSize via the command line.
- To configure the registration in the options:
Ensure the View -> Display -> Application Mode is set to Expert
Set the values at General -> SharePoint Online - Multi factor authentication
- To configure the values from the command line, run TreeSize with the following parameters. TreeSize will remember these values, so you would have to configure them only once.
/AADApplicationIDfollowed by the Application ID assigned by the Azure Portal, e.g./AADApplicationID xxxxxxxx-yyyy-xxxx-yyyy-xxxxxxxxxxxx/AADRedirectURIfollowed by the Redirect URI specified during the registration assigned, e.g./AADRedirectURI |prod|://auth
If you are an administrator and want to configure these settings for a group within your company, you can define an define a group policy object to roll them out:
Download and install the administrative templates for TreeSize.
Open the Group Policy Management Console, and navigate to the GPO you want to contain the configuration or create a new one.
Configure the entries at Administrative Templates > JAM Software > TreeSize > Defaults