Scan Targets
TreeSize can analyze file system paths as well as storages and devices that aren’t accessible via traditional file system paths.
These targets include any folder visible in the Windows Explorer’s left pane.
This chapter details all the target types that TreeSize can scan.

Selecting a scan target
The scan target dialog is the central place for choosing what TreeSize should analyze. Whether you want to scan a local drive, a folder on a network share, a mailbox, or a cloud storage such as Amazon S3, this dialog lets you assemble even complex paths and URLs with just a few clicks – without having to remember the exact syntax.
The dialog opens on the target type you used last, so that repeated scans of the same kind of target take one click less. It is remembered however you leave the dialog, with “Cancel” and Esc as well as with a confirmed selection, and it is kept for as long as TreeSize runs.
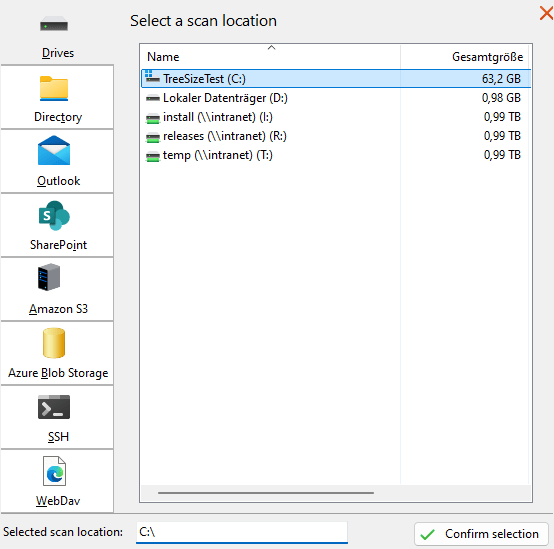
How the dialog is organized
The dialog is split into three areas:
Target list (left): Choose the type of storage you want to scan, for example “Drives”, “Directory”, “SharePoint” or “Amazon S3”. Selecting an entry here changes the input fields shown on the right.
Configuration area (right): Here you specify the exact target. For a local scan this is a drive or folder; for cloud and remote targets you also enter the connection and login details here.
Selected path (bottom): This field always shows the resulting path or URL for your current selection. You can also type or paste a path or URL directly into this field – often the fastest way to start a scan. TreeSize updates the fields on the right automatically to match what you enter.
When you are done, click the button next to the “Selected path” field (“Confirm selection”) to start the scan.
Tip
TreeSize automatically checks your clipboard when the dialog opens. If it contains a path or a supported URL (for example a SharePoint, Azure Blob Storage or Google Drive address), the matching target and fields are filled in for you.
Two options apply regardless of the selected target type:
Show at application start: Controls whether this dialog is shown automatically each time TreeSize starts. You can toggle it here at any time.
Save these credentials for future usage: Available for targets that require a login (like SharePoint, SSH, Amazon S3, Azure Blob Storage, …). When enabled, TreeSize securely stores the credentials so you don’t have to enter them again for the next scan of the same target.
Entering paths and URLs directly
Instead of using the dialog, you can start many scans by typing a path or URL into the drop-down box on top of the directory tree. This is often the fastest way to begin a scan.
Local drives and folders: Enter a path like
C:\Usersdirectly, use the button “Select directory for scan” on the ribbon tab “Home”, or double-click a drive in the drive list in the bottom left corner of the window.Remote file system paths: If a remote path is mapped to a drive letter, scan it like a local drive. TreeSize also supports UNC paths like
\\servername\share. To scan your entire network, choose the “Network” folder in the “Select directory for scan” dialog or use the path\\*. UNC paths can also be added to the drive list using the right-click menu.Mobile devices and smartphones: Devices that support the MTP protocol or WebDAV can be scanned as well. They are typically listed under “This PC” in the Windows Explorer and in the “Select directory for scan” dialog. You can also enter a path like
This PC\Galaxy Tab Ainto the drop-down box.
Available scan targets
Select one of the supported target types on the left-hand side of the dialog. The following sections describe each type and the fields it offers.