|
|||
|
|||
|
|||
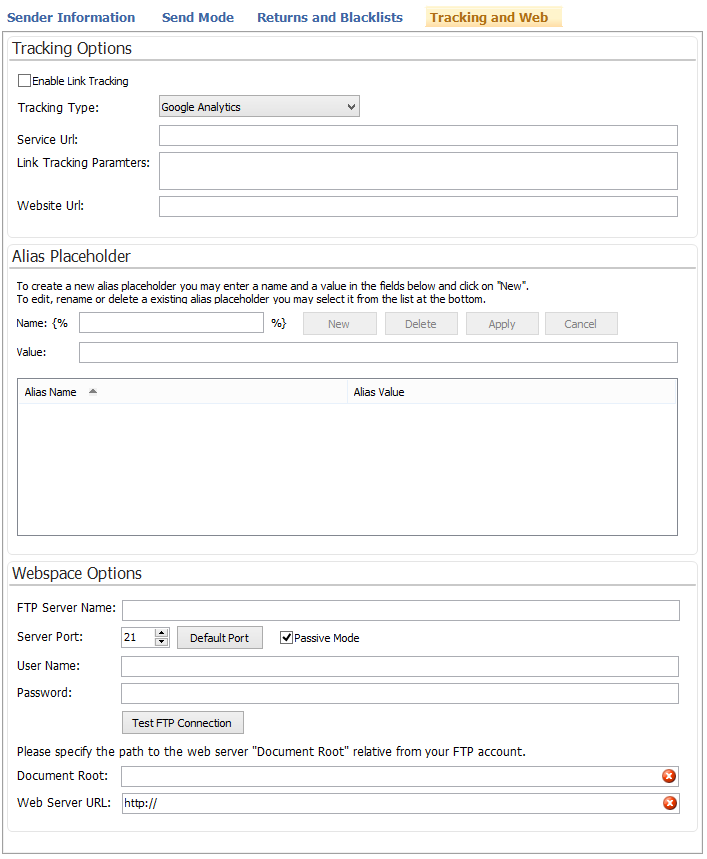
Enable Link Tracking |
Activate the option ”Link Tracking” to have SmartSerialMail help you with the creation of your tracking links. |
||
Tracking Type |
Select the tracking type you want to use. Depending on the tracking solution you use on your website different tracking parameters will be required. |
||
Service Url |
Enter the link to the statistics page provided by your tracking solution. A link to your tracking statistics will be provided in the task overview for each sending task using link tracking. |
||
Link Tracking Parameters |
A pre-configuration of tracking parameters will be offered here (depending on the selected tracking solution). The link tracking parameters show which information can be added to a link to be read by your tracking software. The syntax is as follows: each parameter is followed by a “=” and its name in SmartSerialMail (i.e.: “PARAMETER=NAME”). Each parameter/information pair is separated by a “;”. A “*” in front of the name used in SmartSerialMail shows that this parameter will be the same in the entire email. SmartSerialMail will create a content alias placeholder for such a parameter. “**” in front of the name used in SmartSerialMail means that this parameter will be used throughout the entire profile. SmartSerialMail will create an alias placeholder in the profile. This means that you only have to change the alias placeholder if you want to change all links. |
||
Website Url |
To make sure that SmartSerialMail detects for which links tracking parameters will be required, you will have to enter the URL to your website. If no URL is entered, SmartSerialMail will check all links found in your email for tracking parameters. If a URL is entered, SmartSerialMail will only check links leading to the corresponding website. |
||
After entering all relevant information you can have SmartSerialMail create the required alias placeholders and add the tracking code to the links by clicking “Edit Tracking Parameters” under “Links” in the content tab.
|
|||
|
|||
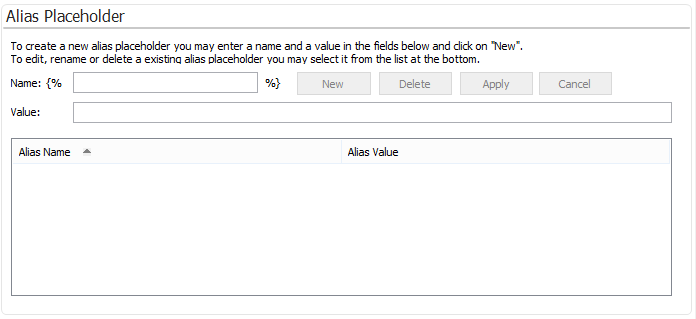
Name |
The name of the placeholder, which will be replaced by the value. |
||
Value |
The value of the placeholder. |
||
New |
Enter name and value for the placeholder and click "New" to create a new alias placeholder. |
||
Delete |
Deletes the chosen placeholder from the list. |
||
Apply |
Apply the changes to the chosen alias placeholder. |
||
Cancel |
Cancel the edit of the chosen placeholder and restore its old values. |
||
|
|||
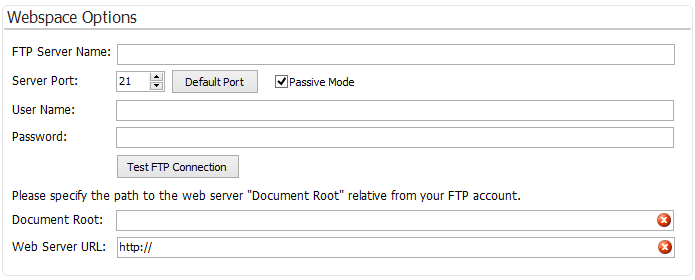
FTP Server Name: |
Set the name of the FTP Server. |
||
Server Port: |
Number that is used to communicate with the FTP server. The default number is 21
|
||
Default Port: |
Resets the server port to its default value (21). |
||
Passive Mode: |
Define if you want to send emails in the passive mode. |
||
User Name: |
|
||
Password: |
Enter the password for your SMTP/Exchange server. If you do not know your password, please ask your Internet provider. As long as the field remains empty, a short help text will be displayed.
|
||
Test FTP Connection: |
By clicking the button 'Test FTP connection', you can test the FTP server settings.
|
||
Document Root: |
Set the relative file path to the document root. |
||
Web Server URL: |
Set the Web server URL of your server. |
||
Images Outsourcing:
SmartSerialMail enables you to save images embedded in an HTML email to your webserver automatically.
Rather than sending the images themselves with each email, only a link to the uploaded pictures will be sent.
This is useful for various reasons:
•The email will be smaller, since the images themselves will not be sent.
•By accessing your webserver statistics, you can determine how often the images were downloaded.
To use this function (Toolbar Picture) you need enter your webspace configuration under 'Internet Options'.
The following information depend on your webspace. Please contact your internet hoster.
1.The name of the FTP server must be entered. The domain should be called with the FTP (e.g. 'ftp://yourdomain.com') and be entered in the "FTP Server Name field."
2.The used server port and the connection mode must be selected (default port for FTP is port 21, in most cases the "Passive Mode" shall be selected).
3.The username and password for FTP access must be defined.
4.The path to the "Document Root" must be entered relative to the FTP access directory.
5.The Web server URL must be specified set (e.g. 'https://www.yourdomain.com').
|
|---|
The document root is the root directory where the site files for a certain domain are located. You can copy files to a webserver via FTP. To enable SmartSerialMail to use FTP to copy images to your web server in a way that makes them downloadale, you need to enter the "Document Root" relative to the FTP access directory. |
An example:
Your web server is reachable under "www.yourdomain.com".
Let's assume your website is located in the directory „./www/“ when accessed via FTP.
In this case, a file „./www/index.htm“ would be reachable under "www.yourdomain.com/index.html".
If you want to make your images under "www.yourdomain.com/newsletterimages/" available, you have to enter the following settings:
"FTP Server Name": |
"ftp://ihredomain.de" |
„Document Root“: |
„./www/newsletterbilder/“ |
„Webserver Url”: |
“www.ihredomain.de/newsletterbilder/“ |
To automatically upload the images proceed as follows:
1.Create an HTML e-mail containing images that can be uploaded to the FTP server.
2.Go to "used images".
3.Click the button "Select All Frames" in the toolbar.
4.Click the button "upload Images" to upload your images to the FTP server.
After the upload is completed you can send your email as usual.
|
|---|
Note that SmartSerialMail will automatically use the uploaded images and not the images on your computer. If you modify an image you will have to upload it again. |


