Check Advanced
Before you can delete, move, deduplicate or export search results, you have to check (checkmark) the items you want to process. “Check Advanced” is the central dialog for doing this automatically: instead of clicking through a number of predefined commands, you combine all criteria that describe your selection in a single dialog, apply them at once, and – if you need the same selection again – save them as a favorite.
“Check Advanced” is available for every file search result list (Basic Search, Duplicate Files and Advanced Search). In the duplicate file search it additionally offers the options that refer to a group of duplicates (newest/oldest copy).
Where to find it
Ribbon: “Operations” tab, in the same group as the “Check” and “Uncheck” dropdowns, via the “Check Advanced” button.
Context menu of the result list: “Check Advanced”.
The Check and Uncheck dropdowns next to the button list the saved Favorites and apply them with a single click, without opening the dialog.
The button is only enabled if the currently displayed search type already contains results.
Note
Which items are affected depends on how you open the dialog. Started from the ribbon, the operation is applied to all items of the currently displayed result list. Started from the context menu while more than one row is selected, it is applied to the selected items only.
The dialog
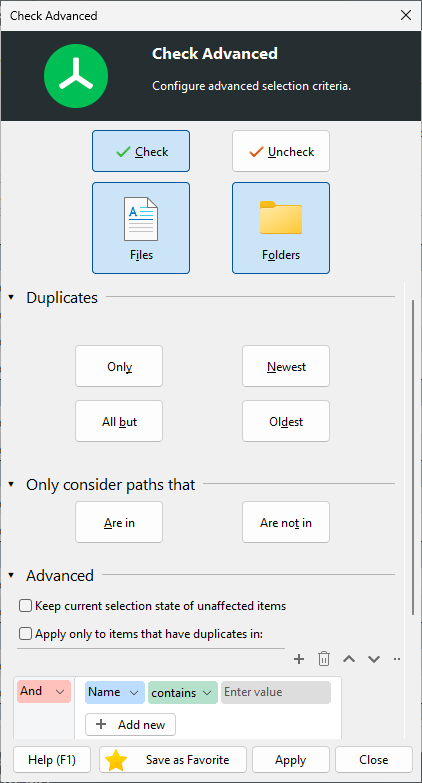
The dialog is divided into a fixed upper area (Check/Uncheck and Files/Folders) and three sections that can be expanded and collapsed by clicking their caption. Sections that contain a setting are expanded automatically when the dialog is reopened, so you can see at a glance what has been configured.
Check or Uncheck
Choose whether the configured criteria should check or uncheck the matching items.
Check builds a new selection: unless the option “Keep current selection state of unaffected items” is enabled, all existing checkmarks are removed first, so the result of the dialog fully replaces the previous selection.
Uncheck only ever removes checkmarks. It always works on the items that are currently checked and never adds a checkmark.
Files and Folders
Select whether the operation should be applied to files, folders, or both. Both buttons can be active at the same time, but at least one of them must stay active.
Duplicates
This section is only shown in the duplicate file search. It defines which member of a duplicate group the operation refers to:
Newest / Oldest select the file of the group with the newest or the oldest “Last modified” date.
Only restricts the operation to exactly that file of each group, All but applies it to every other file of the group.
Both settings belong together: either you select an amount and a specification, or neither of them. Selecting one of the two automatically activates a default for the other, and deselecting one deselects the other.
If you leave this section empty, no duplicate specific logic is used and the operation simply applies to all items that match the remaining criteria.
Note
“All but newest” is the typical choice for a cleanup: the newest copy of each group stays untouched, all older copies are checked and can then be deleted or replaced by hardlinks (see Understanding the deduplication process).
Only consider paths that
Restricts the operation to a folder branch:
Are in only affects items below the given path.
Are not in only affects items outside the given path – useful to protect a location such as an archive folder from being checked at all.
The path input field appears as soon as one of the two options is selected. An empty path means “no path restriction”. A path that does not exist is marked with a hint below the field, and applying or saving the configuration is refused until it has been corrected.
Note
In the duplicate search, the path restriction is already taken into account
when the newest/oldest member of a group is determined. “Check all but
newest, are in D:\Projects” therefore keeps the newest file within
that folder and checks the other copies located there, regardless of
whether a newer copy exists somewhere else. The same applies to the
Files/Folders selection and the custom filter.
Advanced
The “Advanced” section contains the options that modify the operation itself:
Keep current selection state of unaffected items – by default a check operation replaces the existing selection. With this option enabled, items that are not matched by the criteria keep their current check state, so several configurations can be combined one after another to build up a selection.
Apply only to items that have duplicates in (duplicate search only) – checks all items that have a copy below the given folder. This is the “a copy exists in a safe location” case: it lets you check the copies in the other folders before you delete them. If this option is used, it takes precedence over the “Only consider paths that” setting. It cannot be combined with a newest/oldest selection: enabling it clears that selection, and picking a newest/oldest option clears this one.
Custom filter – a full filter expression built with the standard filter editor. Any property that is available for search filters can be used here (name, path, size, dates, attributes, owner, …), and several conditions can be combined. See What types of filters are available? for the available filter types.
How the criteria are combined
All criteria of the dialog are combined with a logical AND: an item is affected only if it matches the duplicate rule and lies in the configured path and is of the selected type (file/folder) and matches the custom filter.
Some examples:
Check – Files – All but Newest → in every duplicate group all copies except the newest one are checked.
Check – Files – All but Oldest – Are not in ``C:Archive`` → the oldest copy is kept and the archive folder stays completely untouched.
Check – Files – custom filter “Size > 100 MB” → all files larger than 100 MB are checked, independent of any duplicate group.
Uncheck – Folders → removes the checkmarks from all folders while the checked files stay checked.
Note
All criteria apply in both directions. An uncheck never touches items outside the configured path, item type or filter, and it never adds a checkmark - so a configuration can be applied repeatedly without surprises.
Favorites
A configuration that you need regularly does not have to be reconfigured every time. Save as Favorite stores it under a name of your choice; the name suggested by the dialog describes the configuration (for example “Check All but Newest Files”) and can be accepted or replaced.
Saved favorites appear in the Check and Uncheck dropdowns of the ribbon and are applied to the current result list with a single click. Each dropdown only shows the favorites of its own side (check or uncheck) and of the current search type, so a duplicate specific favorite is not offered in a basic search.
Besides your own favorites, both dropdowns contain the entry “Check all” / “Uncheck all” and a set of predefined favorites:
Duplicate file search: “All but Newest”, “All but Oldest”, “Only Newest” and “Only Oldest”, each as a check and as an uncheck variant.
Basic and Advanced Search: “Check Files”, “Check Folders”, “Uncheck Files” and “Uncheck Folders”.
Managing favorites
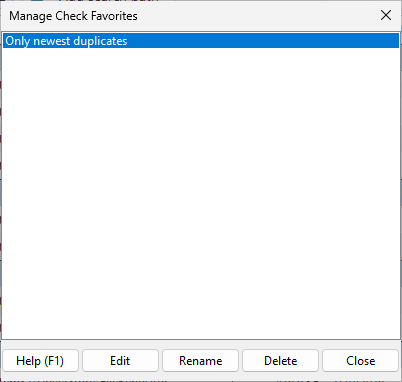
The last entry of each dropdown, “Manage Favorites”, opens the favorites manager for exactly that list. It shows your own favorites and offers:
Edit opens the “Check Advanced” dialog with the stored configuration so you can change any of its criteria.
Rename changes the displayed name.
Delete removes the favorite.
The predefined favorites are part of the program and are therefore not listed in the manager; they cannot be edited or deleted, but they remain available in the dropdowns.
Note
Favorites are stored with the file search options and are therefore available again the next time you start the TreeSize File Search.